Last updated March 28, 2025
In this guide, we walk you through the process of migrating your Postgres database from Google Cloud SQL to Heroku Postgres. This guide uses Google Cloud Storage to store the database dump file. Before starting the migration, make sure you completed the steps from Preparing Your Migration to Heroku Postgres.
Get Your Database Size
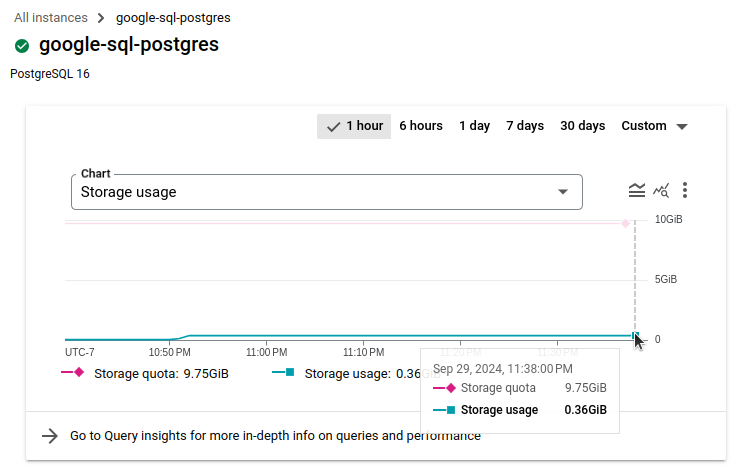
In most cases, the dump and restore strategy for migration is suitable if your database size is less than 100 GB. With a Google Cloud SQL database, there are multiple ways to determine your database size. When you select your database through the Google Cloud SQL dashboard, you can see the metrics visualizations at the top of the Overview page. To view the storage, select the Storage usage chart.

In the example, the storage usage is at 0.36 GB, or approximately 390 MB. However, this number includes all storage for the system running on your managed instance, including system files, installations, and more. So, the actual database size is only a fraction of this number.
For a more accurate size reading, connect to your database instance and use the list databases \l+ command. On the Overview page, you see the Public IP address for connecting to your Google Cloud SQL instance.

The connection string for using the psql client uses the format:
postgres://DB_USERNAME:DB_PASSWORD@DB_HOST:DB_PORT/DB_NAME
For Google Cloud SQL PostgreSQL databases, the DB_USERNAME is postgres and the DB_HOST is the public IP address.
Our example database is called coffeeshopdb, so we connect our database to the psql client with:
$ psql postgresql://postgres:mypassword@35.222.61.199:5432/coffeeshopdb
After connecting, you can show the database size with the list databases \l+ command:
$ psql=> \l+

                        List of databases
    Name        | Owner    | Encoding |   Collate   | Size   |
----------------+----------+----------+-------------+--------+
 coffeeshopdb   | postgres | UTF8     | en_US.UTF-8 | 251 MB |
The Size column shows our database size is 251 MB.
See Choosing the Right Heroku Postgres Plan for which Heroku Postgres plan fits your database size.
Prepare the Database Dump
Before starting, either set your system to read-only mode, or bring all your dependent services offline and notify end users of the current maintenance status.
If your database is attached to a Heroku app, put your app in maintenance mode.
Back Up Your Database
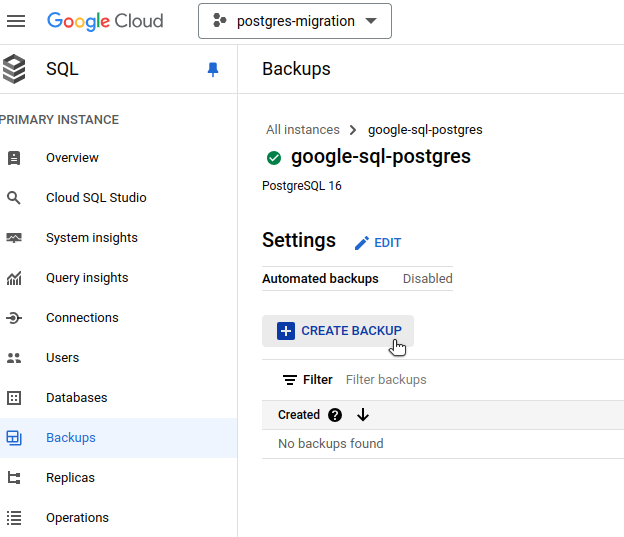
Back up your database on Google by navigating to the Backups page for your database, and click Create Backup.

Dump the Database to a Local File
Using pg_dump, dump your Google Cloud SQL database to a local file:
$ pg_dump postgres://DB_USERNAME:DB_PASSWORD@DB_HOST:DB_PORT/DB_NAME \
    -Fc -b -v \
    -f /tmp/data-for-migration.sql
The time it takes to run this command varies depending on the size of your database. You can keep an eye on the file size of /tmp/data-for-migration.sql to verify that the long process is running.
Upload the File to Google Cloud Object Storage
Heroku can restore a Postgres database from a file that’s accessible via a URL. For this migration from Google Cloud SQL, you can upload your data backup file to Google Cloud Storage, then obtain a signed URL for that file.
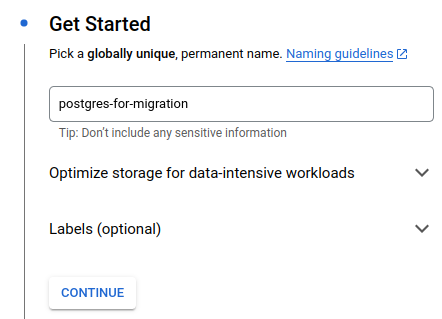
First, create a bucket. In our example, we named our bucket postgres-for-migration.

For security, make sure to set the access policy for your bucket to prevent public access.

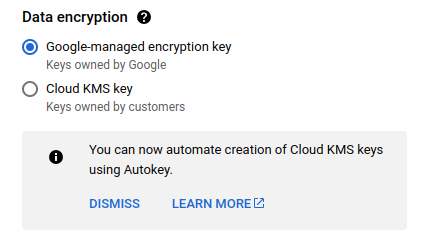
In addition, make sure your bucket uses proper encryption.

After creating your bucket in Google Cloud Storage, upload the /tmp/data-for-migration.sql file from the Dump the Database to a Local File step.

Perform the Restore Migration
Create a Heroku app
Use the Heroku CLI to log into your Heroku account.
$ heroku login
Next, create a Heroku app and provide a name for it, such as postgres-migration-from-google.
$ heroku apps:create postgres-migration-from-google
Creating ⬢ postgres-migration-from-google... done
Create the Heroku Postgres Add-on
After creating your Heroku app, add the Heroku Postgres add-on with an appropriate plan. Based on the database information from Get Your Database Size, we use the Essential-1 Postgres plan.
$ heroku addons:create \
    --app psql-migration-from-google \
    heroku-postgresql:essential-1
Creating heroku-postgresql:essential-1 on ⬢ psql-migration-from-google... ~$0.013/hour (max $9/month)
Database should be available soon
postgresql-elliptical-46201 is being created in the background. The app will restart when complete...
Use heroku addons:info postgresql-elliptical-46201 to check creation progress
Use heroku addons:docs heroku-postgresql to view documentation
Heroku begins provisioning a Postgres database for your Heroku app, providing a unique name. Within a few minutes, you can run the following command with the database name to see the created database.
$ heroku addons:info postgresql-elliptical-46201
=== postgresql-elliptical-46201

Attachments:  psql-migration-from-google::DATABASE
Installed at: Mon Sep 30 2024 05:15:00 GMT-0700 (Mountain Standard Time)
Max Price:    $9/month
Owning app:   psql-migration-from-google
Plan:         heroku-postgresql:essential-1
Price:        ~$0.013/hour
State:        created
Install Necessary Extensions for Heroku Postgres
Before migrating data, install any extensions you had in your Google Cloud SQL instance.
First, to see what extensions are already installed on your Heroku Postgres instance, connect to your Heroku Postgres instance with pg:psql:
$ heroku pg:psql --app psql-migration-from-google
--> Connecting to postgresql-elliptical-46201
psql (16.4 (Ubuntu 16.4-1.pgdg20.04+1), server 16.2)
SSL connection (protocol: TLSv1.3, cipher: TLS_AES_256_GCM_SHA384, compression: off)
Type "help" for help.

psql=> \dx
                     List of installed extensions
        Name        | Version |   Schema   |          Description
--------------------+---------+------------+-------------------------------
 pg_stat_statements | 1.10    | public     | track planning and executio...
 plpgsql            | 1.0     | pg_catalog | PL/pgSQL procedural language
(2 rows)
Install any extensions you had at Google Cloud that aren’t already in Heroku Postgres. From our example, we need the tablefunc and uuid-ossp extensions.
$ psql=> CREATE EXTENSION IF NOT EXISTS tablefunc;
CREATE EXTENSION
psql=> CREATE EXTENSION IF NOT EXISTS "uuid-ossp";
CREATE EXTENSION

psql=> \dx
                     List of installed extensions
        Name        | Version |   Schema   |          Description
--------------------+---------+------------+-------------------------------
 pg_stat_statements | 1.10    | public     | track planning and execution…
 plpgsql            | 1.0     | pg_catalog | PL/pgSQL procedural language
 tablefunc          | 1.0     | public     | functions that manipulate…
 uuid-ossp          | 1.1     | public     | generate universally unique…

(4 rows)
See Extensions, PostGIS, and Full Text Search Dictionaries on Heroku Postgres for supported extensions and how to install them.
Get the Signed URL For the File in Google Cloud Storage
Next, restore all the data from your pg_dump backup to your new Heroku Postgres database. For this, you need a URL that points to your backup file. Using the gcloud CLI, you can use the gcloud storage sign-url operation to generate this URL. Make sure you created a service account with permissions to access Cloud Storage objects. The command looks like:
$ gcloud storage sign-url \
    gs://postgres-for-migration/data-for-migration.sql \
    --private-key-file=/path/to/service/account/key-file.json \
    --duration=10m
The signed URL is only temporarily valid for a duration that you specify. Choose a reasonable expiration time, such as 10 minutes. The resulting signed URL contains the signature and other metadata like query parameters. It looks similar to this example:
https://storage.googleapis.com/postgres-for-migration/data-for-migration.sql?x-goog-signature=8bd06523e76bc303158880306af5c4fe9626b21427f69f70d2453aa95e63fd142f6825b2b0c5115d2b4ecbbf92ce9dcb3b206f92062f77db43d5ff631e083a64aa0bbe126672cf57ede6d33a229d444882db88cc5e408295f627e75f73393b9a7a42056c311f4b8b173b36836aa8aaf80ff59d4fc4819f14d33745219bb04dbc831ad85b74721201ab7be2f83afbba0601b0cf6817ed93f43121331fdc5aabb40efa2d9f606d4313255c3f85a75f6787e1ca8e58776ea9547954910522002784b3f0fab784559d6b8f97cb1648c22b229ab82811cb0185c709226502462a2fc90d44f6406d925150b4ec1f252cff18f5c1eaa43ada3b06247209bcd2445e2f1c&x-goog-algorithm=GOOG4-RSA-SHA256&x-goog-credential=gloud-sign-urls%40postgres-migration-437205.iam.gserviceaccount.com%2F20240930%2Fus-east1%2Fstorage%2Fgoog4_request&x-goog-date=20240930T063217Z&x-goog-expires=600&x-goog-signedheaders=host
Restore on Heroku
Now that you have the presigned URL, use the Heroku pg:backups:restore command to restore your Heroku Postgres database from your file in Google Cloud Storage. The command looks like:
$ heroku pg:backups:restore 'GOOGLE-SIGNED-URL-IN-QUOTES' \
    --app psql-migration-from-google \
    --confirm psql-migration-from-google

Use Ctrl-C at any time to stop monitoring progress; the backup will continue restoring.
Use heroku pg:backups to check progress.
Stop a running restore with heroku pg:backups:cancel.

Starting restore of [GOOGLE-SIGNED-URL] to postgresql-elliptical-46201... done
Restoring... done
Keep in mind with this command:
- When you paste in your Google-signed URL, make sure to contain it within quotes.
- Provide the
--appargument to tell Heroku which application and corresponding database you want to operate on. - This command is destructive, requiring you to confirm it. If you don’t provide the
--confirmargument, you’re asked to confirm the action before continuing.
Migrate Any Custom Settings
Just as you saved your Google Cloud SQL Postgres configurations to a file called /tmp/settings_postgres.csv, you can do the same for your Heroku Postgres configuration with the command:
$ heroku pg:psql --app postgres-migration-from-google \
    -c "\copy (select * from pg_settings) to '/tmp/settings_heroku.csv' with (format csv, header true);"
Compare your Heroku Postgres settings with your Google Cloud SQL settings. Find any configurations from your Google setup and reapply them to your Heroku Postgres instance.
Testing and Verifying a Successful Migration
We recommend testing to verify that data has migrated over successfully. Testing can include:
- Comparing table counts between the two databases.
- Comparing row counts for every table between the two databases.
- Comparing query results between the two databases.
- Running various acceptance tests on your new database, validating proper behavior and performance.
Connecting Existing Applications and Services
After verifying that the database migration was successful, point your existing applications and services to the new database.
Get Heroku Postgres Credentials
When you create the Heroku Postgres add-on, Heroku automatically configures a new environment variable called DATABASE_URL, which contains the credentials and connection information for your new database. Run the heroku config:get command to fetch the variable:
$ heroku config:get DATABASE_URL --app psql-migration-from-google

postgres://u7j1fm3qa8npss:p890a576e7717f06e81f4bba65f8f901cd00c7a402ef6570af470c251933347eb@c2ihhcf1divl18.cluster-czrs8kj4isg7.us-east-1.rds.amazonaws.com:5432/d4sqvro2ljuspb
You can also find your credentials with the heroku:pg:credentials command.
The Postgres URI follows this format, so that you can parse the individual pieces:
postgres://DB_USERNAME:DB_PASSWORD@DB_HOST:DB_PORT/DB_NAME
Update Dependent Systems and Test
Update your existing systems to point to Heroku Postgres with this information. Test each system to make sure the connection is successful.
At this point, you can also stop your Google Cloud SQL database. Navigate to the top of your database Overview page and click Stop.

Wrap-up
Now that your applications and services are pointing to Heroku Postgres and running as expected, you can close the maintenance window and restore full availability to your end users.
When you’re confident that the migration is successful and you no longer need your Google Cloud SQL database, you can delete it completely.
With your migration complete, you can now enjoy the flexibility and low-cost convenience of Heroku Postgres. See our Heroku Postgres documentation for more information on using your database.