この記事の英語版に更新があります。ご覧の翻訳には含まれていない変更点があるかもしれません。
最終更新日 2025年09月09日(火)
並列リクエストを処理する Web アプリケーションのほうが、一度に 1 つのリクエストしか処理しない Web アプリケーションより dyno リソースをより効率的に使用します。Puma は Unicorn と競合する Web サーバーで、並列リクエストの操作ができます。
Puma は、Worker プロセスだけでなくスレッドを使用して、使用可能 CPU をより活用します。Puma でスレッドを使用できるのは、コードベース全体がスレッドセーフな場合だけです。安全でない場合は、Puma を使用できても、ワーカープロセスを通してスケールアウトしなければなりません。
このガイドでは、Puma Web サーバーを使用して新しい Rails アプリケーションを Heroku にデプロイする方法について説明します。基本的な Rails の設定については、Rails スターターガイドを参照してください。
必ず新しいデプロイをステージング環境でテストした後に、本番環境へデプロイしてください。
Puma をアプリケーションに追加する
Gemfile
最初に、Puma をアプリの Gemfile に追加します。
gem 'puma'
Procfile
Puma をアプリケーションの Procfile で Web プロセスのサーバーとして設定します。ほとんどの値をインラインで設定できます。
web: bundle exec puma -t 3:3 -p ${PORT:-3000} -e ${RACK_ENV:-development}
しかし、設定ファイルを生成することをお勧めします。
web: bundle exec puma -C config/puma.rb
Procfile で大文字が正しく使われて Git にチェックインされるようにしてください。
Puma のバージョン
Heroku では、Router 2.0 のキープアライブリクエストとの互換性を確保するため、Puma 7 以降を強く推奨しています。
設定
Puma の設定ファイルを config/puma.rb、または好きなパスに作成します。単純な Rails アプリケーションでは、次の基本設定を推奨します。
# Processes count, allows better CPU utilization when executing Ruby code.
workers(ENV.fetch('WEB_CONCURRENCY') { 2 })
# Thread per process count allows context switching on IO-bound tasks for better CPU utilization.
threads_count = ENV.fetch('RAILS_MAX_THREADS') { 3 }
threads(threads_count, threads_count)
# Reduce memory usage on copy-on-write (CoW) systems.
preload_app!
# Ruby buildpack sets RAILS_ENV and RACK_ENV in production.
run_env = ENV["RAILS_ENV"] || ENV["RACK_ENV"] || "development"
environment(run_env)
# Support IPv6 by binding to host `::` in production instead of `0.0.0.0` and `::1` instead of `127.0.0.1` in development.
host = run_env == "production" ? "::" : "::1"

# PORT environment variable is set by Heroku in production.
port(ENV.fetch("PORT") { 3000 }, host)
# Allow Puma to be restarted by the `rails restart` command locally.
plugin(:tmp_restart)
# Heroku strongly recommends upgrading to Puma 7+. If you cannot upgrade,
# please see the Puma 6 and prior configuration section below.
#
# Puma 7+ already supports PUMA_PERSISTENT_TIMEOUT natively. Older Puma versions set:
#
# ```
# persistent_timeout(ENV.fetch("PUMA_PERSISTENT_TIMEOUT") { 95 }))
# ```
#
# Puma 7+ fixes a keepalive issue that affects long tail response time with Router 2.0.
# Older Puma versions set:
#
# ```
# enable_keep_alives(false) if respond_to?(:enable_keep_alives)
# ```
You must also ensure that your Rails application has enough database connections available in the pool for all threads and workers. (This will be covered later).
Workers
# Processes count, allows better CPU utilization when executing Ruby code.
workers(ENV.fetch('WEB_CONCURRENCY') { 2 })
この値を手動で設定するには、
heroku config:set WEB_CONCURRENCY を使用します。アプリケーションの負荷テストを実行して、アプリに適切な値を見つけます。
Puma が各 dyno 内で複数の OS プロセスを分岐するので、Rails アプリが複数の並列リクエストをサポートできるようになります。Puma 用語で、これらは Worker プロセスと呼ばれます (Heroku Worker プロセスがそれぞれの dyno で実行されるのと混同しないようにしてください)。Worker プロセスは OS レベルでは互いに分離されているため、スレッドセーフにする必要がありません。
マルチプロセスモードは、JRuby または Windows を使用していると機能しません。理由は、JVM および Windows が複数のプロセスをサポートしないためです。JRuby または Windows を使用している場合はこの行を設定から省略してください。
Worker プロセスを使用するごとに新たなメモリが使われます。この動作によって、1 つの dyno で実行できるプロセスの数が制限されます。一般的な Rails メモリフットプリントでは、2 ~ 4 の Puma Worker プロセスを eco、basic または standard-1x dyno で実行できます。ご使用のアプリケーションでは、具体的なメモリフットプリントに応じて、おおよそ同等数が可能になります。アプリケーションの高速チューニングを可能にするため、この数を環境設定で指定することをお勧めします。アプリケーションログの R14 エラー (メモリ割り当てを超過) について、当社のロギングアドオンまたは Heroku ログで調べてください。
スレッド
# Thread per process count allows context switching on IO-bound tasks for better CPU utilization.
threads_count = ENV.fetch('RAILS_MAX_THREADS') { 3 }
threads(threads_count, threads_count)
Puma は各リクエストを、内部スレッドプールのスレッドで処理できます。この動作により、Puma が Web アプリケーションにさらなる同時性を提供します。大まかに言えば Worker が使う RAM とスレッドが使う CPU が増えることで、同時性が向上します。
MRI では、Global Interpreter Lock (GIL) によっていつでも 1 つのスレッドだけが実行されます。データベース呼び出し、ファイルシステムとの相互作用、あるいは外部 http 呼び出しなどの IO 操作によって GIL がロックされなくなります。ほとんどの Rails アプリケーションが IO を大量に使用します。そこで、さらなるスレッドを追加することで Puma は複数のスレッドを処理できるようになり、スループットが向上します。JRuby と Rubinius も Puma を使用することでメリットが得られます。これらの Ruby 実装には GIL がなく、すべてのスレッドを、中で何が起こっているかにかかわらず、並列実行します。
Puma ではスレッドプールを min および max 設定で設定して、各 Puma インスタンスが使用するスレッドの数をコントロールできます。最小スレッド数の設定では、負荷がかかっていないときのリソースをアプリケーションが減少できます。Heroku ではアプリケーションがすべてのリソースを所定の dyno で消費できるため、この機能は必要ありません。最小が最大と等しくなるよう設定することをお勧めします。
各 Puma Worker が、指定する最大数のスレッドまで生成できるようになります。
アプリの事前ロード
# Reduce memory usage on copy-on-write (CoW) systems.
preload_app!
アプリケーションを事前ロードすると個々の Puma Worker プロセスの起動時間が減り、on_worker_boot 呼び出しを使用して各 Worker の外部接続を管理できるようになります。上の設定では、これらの呼び出しは、各 Worker プロセスの Postgres 接続を正しく確立するために使用します。
環境
# Ruby buildpack sets RAILS_ENV and RACK_ENV in production.
run_env = ENV["RAILS_ENV"] || ENV["RACK_ENV"] || "development"
environment(run_env)
Puma の環境を設定します。Heroku で ENV['RACK_ENV'] がデフォルトで 'production' に設定されます。
ポート
# Support IPv6 by binding to host `::` in production instead of `0.0.0.0` and `::1` instead of `127.0.0.1` in development.
host = run_env == "production" ? "::" : "::1"
# PORT environment variable is set by Heroku in production.
port(ENV.fetch("PORT") { 3000 }, host)
Heroku は、Web プロセスが起動するとき ENV['PORT'] を設定します。ローカルで、これを 3000 にデフォルト設定して Rails のデフォルトに合わせます。ホストは、IPv6 の 0.0.0.0 に相当する "::" を使用します。
ローカルで実行する場合は、開発環境をインターネットに公開しないことが重要です。通常は本番環境のエンドユーザーには表示されない詳細なエラーメッセージやスタックトレースが表示されてしまうためです。本番以外の環境では、ホストは ::1 を使用します。これは、IPv6 の 127.0.0.1 に相当します。
タイムアウト
Puma 内にはリクエストタイムアウトのメカニズムがありません。Heroku ルーターは 30 秒を超えたすべてのリクエストをタイムアウトにします。エラーがクライアントに返されますが、ルーターが Puma にリクエストが早く終了したことを知らせる方法がないので、Puma はリクエストに対する動作を継続します。処理能力の停滞を防ぐため、Rack::Timeout を使用して時間がかかっているリクエストを終了してそのリクエスト元を特定することをお勧めします。
ラックタイムアウト gem をプロジェクトに追加します。
# Gemfile
gem "rack-timeout"
注意: この環境変数サポートには、rack-timeout 0.5.0 以上が必要です。RACK_TIMEOUT_TERM_ON_TIMEOUT 設定では、rack-timeout 0.6.0 以上が必要です。
フォーキング Web サーバーなし (Puma ワーカーなし) で RACK_TIMEOUT_TERM_ON_TIMEOUT=1 使用すると、タイムアウトによって、単一のプロセスが再起動されるのではなく、Web サーバー全体が終了します。
その後、環境設定を介して動作を設定できます。ワーカー (プロセス) を使用している場合は、turn on timeout をオンにすることをお勧めします。これによりプロセスが再起動され、スレッドを強制終了するよりも安全です。
$ heroku config:set RACK_TIMEOUT_TERM_ON_TIMEOUT=1
さまざまなラックタイムアウト設定を理解するため、双方向型ラックタイムアウトデモのセットでこれらの設定がどのように動作するかを調べることができます。Heroku でのタイムアウトを削減またはデバッグするためのその他の提案については、「H12 - Ruby (MRI) でのリクエストタイムアウト」を参照してください。
キープアライブ
# Heroku strongly recommends upgrading to Puma 7+. If you cannot upgrade,
# please see the Puma 6 and prior configuration section below.
#
# Puma 7+ already supports PUMA_PERSISTENT_TIMEOUT natively. Older Puma versions set:
#
# ```
# persistent_timeout(ENV.fetch("PUMA_PERSISTENT_TIMEOUT") { 95 }))
# ```
#
# Puma 7+ fixes a keepalive issue that affects long tail response time with Router 2.0.
# Older Puma versions set:
#
# ```
# enable_keep_alives(false) if respond_to?(:enable_keep_alives)
# ```
When using Heroku router 2.0, requests passed to the dyno may use the HTTP/1.1 feature “keepalive.” A bug documented in Puma was fixed in Puma 7+. This puma bug allows such a request to monopolize a web thread, resulting in worse long tail response times. Users of older Puma versions are suggested to turn off keepalive requests in the Puma config or at the router labs level.
By default, the Ruby buildpack will set PUMA_PERSISTENT_TIMEOUT, which is configured to be the persistent keepalive timeout value of the router plus a few seconds, so that the server does not close a connection while the router is trying to deliver a new response.
Rackup
# Not required on newer Puma versions
# ```
# rackup(DefaultRackup)
# ```
Older versions of Puma did not default to a rackup file and required this line. You can use the rackup command to tell Puma how to start your rack app. The above configuration should point at your application’s config.ru, which is automatically generated by Rails when you create a new project.
On worker boot
Using on_worker_boot is no longer needed for Rails 5.2+ apps as forked connections will automatically re-connect.
Puma 7+ renamed on_worker_boot to before_worker_boot.
The before_worker_boot block runs after a worker spawns, but before it begins to accept requests. This block is especially useful for connecting to different services, as connections cannot be shared between multiple processes. This behavior is similar to Unicorn’s after_fork block. It is only needed if you are using multi-process mode (i.e. have specified workers).
If you are using Rails 4.1+ you can use the database.yml to set your connection pool size, and this is all you need to do:
# For apps using the `config/database.yml` method of setting `pool` size
# Worker-specific setup for Rails 4.1 to 5.2, after 5.2 it's not needed.
#
# ```
# defined?(before_worker_boot) ? before_worker_boot : on_worker_boot do
#   ActiveRecord::Base.establish_connection
# end
# ```
Otherwise, you must be very specific with the reconnection code:
# Valid on Rails up to 4.1, the initializer method of setting `pool` size
#
# ```
# defined?(before_worker_boot) ? before_worker_boot : on_worker_boot do
#   ActiveSupport.on_load(:active_record) do
#     config = ActiveRecord::Base.configurations[Rails.env] ||
#              Rails.application.config.database_configuration[Rails.env]
#     config['pool'] = ENV['RAILS_MAX_THREADS'] || 5
#     ActiveRecord::Base.establish_connection(config)
#    end
# end
# ```
If you are already using an initializer, you should switch over to the
database.ymlmethod as soon as possible. Using an initializer requires duplicating code if when using hybrid mode in Puma. The initializer method can cause confusion over what is happening and is the source of numerous support tickets.
In the default configuration, we are setting the database pool size. For more information, please read Concurrency and Database Connections in Ruby with ActiveRecord. We also make sure to create a new connection to the database here.
If you get connection errors while booting up your application, consult the gem documentation for the service you are attempting to communicate with to see how you can reconnect in this block.
Slow clients
A slow client is one that sends and receives data slowly. For example, an app that receives images uploaded by users from mobile phones that are not on WiFi, 4G, or other fast networks. This type of connection can cause a denial of service for some servers, such as Unicorn, as workers must sit idle as they wait for the request to finish. To protect your application, either move to a server with built-in slow client protection, such as Puma, or run behind a proxy server, such as NGINX, that handles slow clients. The Unicorn web server must run behind NGINX, or it is vulnerable to slow client attacks.
Puma can allow multiple slow clients to connect without requiring a worker to be blocked on the request transaction. Because of this, Puma handles slow clients gracefully. Heroku recommends Puma for use in scenarios where you expect slow clients.
For more details on how Puma mitigates slow clients, read Puma 4: New I/O 4 Your Server
Database connections
As you add more concurrency to your application, it will need more connections to your database. A good formula for determining the number of connections each application will require is to multiply the RAILS_MAX_THREADS by the WEB_CONCURRENCY. This combination will determine the number of connections each dyno will consume.
Rails maintains its database connection pool, with a new pool created for each worker process. Threads within a worker will operate on the same pool. Make sure there are enough connections inside your Rails database connection pool so that the RAILS_MAX_THREADS number of connections can be used. If you see this error:
ActiveRecord::ConnectionTimeoutError - could not obtain a database connection within 5 seconds
This error indicates that your Rails connection pool is too low. For an in-depth look at these topics, please read the Dev Center article Concurrency and Database Connections.
Backlog
It is possible to set a “backlog” value for Puma. This setting is the number of requests that will be queued at the socket before Puma begins rejecting HTTP requests. The default value is to 1024. We recommend not modifying this value or decreasing it. It may seem like a good idea to reduce this value, so when a dyno is busy, a request can get sent to a less busy dyno. When Heroku re-routes a bounced request, it assumes your entire app is saturated. Each connection gets delayed by 5 seconds, so you’re automatically being penalized 5 seconds per request. You can read more about routing behavior. In addition, when one of your dynos starts bouncing requests, it’s likely due to an increase in load, and all of your dynos will be bouncing requests. Repeatedly bouncing the same request will result in higher error rates for your customers.
An arbitrarily high backlog value allows your dyno to handle a spike in requests. Lowering this value does little to speed up your app and will actively cause more failed requests for your customers. Heroku recommends NOT setting the backlog value, and instead using the default value.
Thread safety
Thread-safe code can run across multiple threads without error. Not all Ruby code is threadsafe, and it can be challenging to determine if your code and all of the libraries you are using can run across multiple threads.
If you haven’t run your application in a threaded environment such as Sidekiq or Puma before, you can first try using Puma and adding Rack::Lock middleware, which wraps each request in a mutex so that every request is effectively run synchronously.
# config/initializers/rack_lock.rb

Rails.application.config.middleware.insert_before 0, Rack::Lock
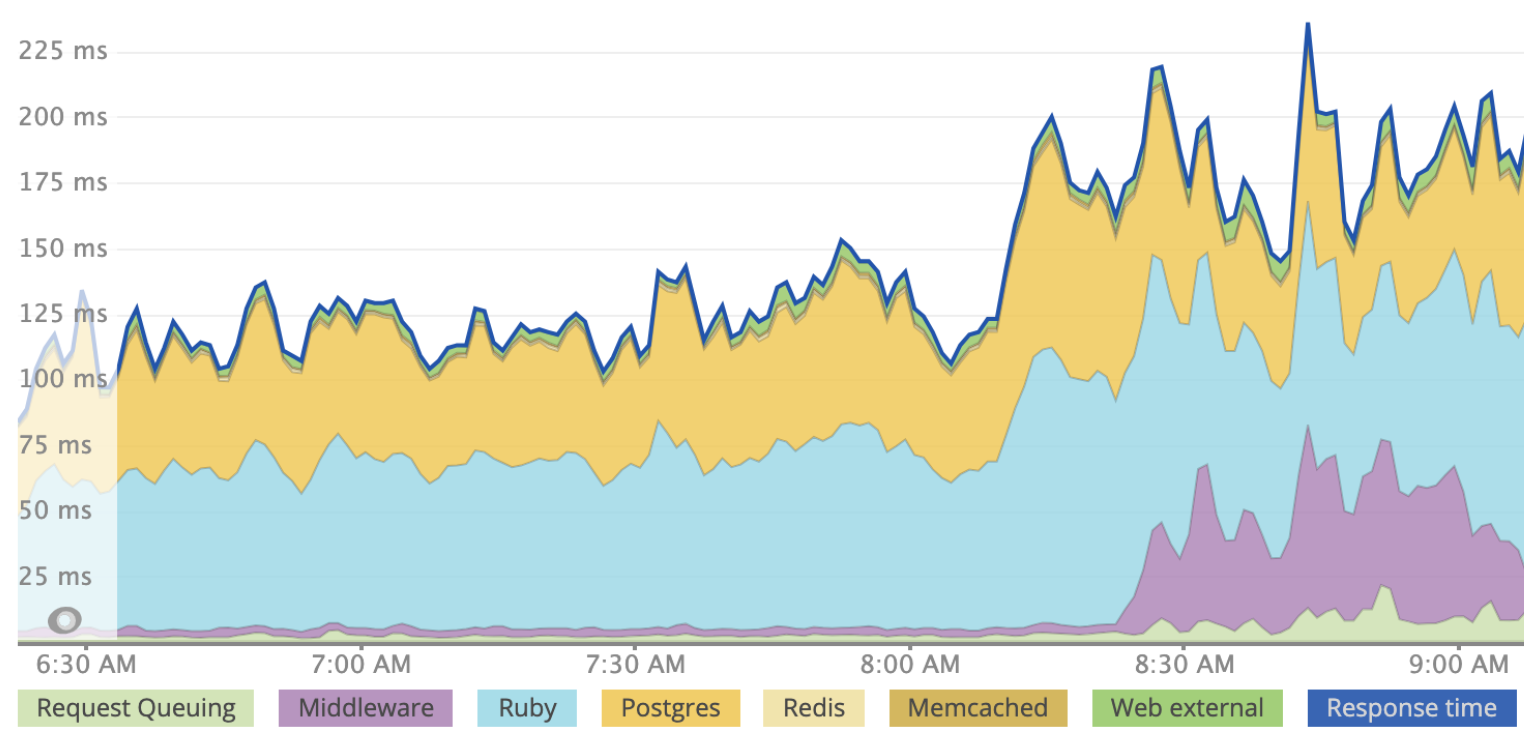
Rack::Lock によってスレッドセーフティの問題がアプリケーションで起きなくなりますが、このミドルウェアの同期的性質は、アプリケーションの応答速度がスレッドを使用している場合より遅くなることを意味します。複数の Worker と Worker あたり 3 つのスレッドを使用して本番環境にデプロイしたアプリケーションの例をここに示します。Rack::Lock は、説明目的のため、8:30 pm よりわずか前に導入しています。「ミドルウェア」の紫色のリクエスト時間が増大しています。
Rack::Lock によって複数のスレッドを利用できなくなりますが、Worker を追加することで同時性を得ることができます。Worker は異なるプロセスで実行され、メモリを共有しないので、スレッドセーフでないコードが複数の Worker プロセスで実行される可能性があります。しかし、リソースの使用率を最大化するため、プロセスとスレッドの両方で実行できるようにすることをお勧めします。
スレッドセーフティのヒント
スレッド化された Worker または Web サーバー (Puma など) を初めて使う方は、どうしたら自分のアプリがスレッドセーフかどうかわかるでしょうか ? 残念ながら、スレッドセーフティについて正確に調べられるリトマス試験紙はありませんが、調べることができるいくつかの領域があります。
スレッドセーフな依存関係を確保する。すべての gem がスレッドセーフであることを確認してください。比較的よく使われており、過去 1 年内のリリースがあるほとんど (すべてでなくても) の gem がスレッドセーフである必要があります。
グローバルを変化させない。一般に、グローバルアクセス可能な値は変化しないようにしたいと考えます。たとえば Kernel.const_set をリクエストで使用していれば、それが現在のリクエストだけでなく、すべてのスレッドのすべてのリクエストに影響を与えます。このスタックオーバーフローの回答からスレッドセーフでない他のいくつかの領域についてアイデアを得ることができます。
ラックフリーズ を使用する。この gem は、ミドルウェアが誤って変更されるのを防ぎます。ラックフリーズは Rack::Lock とは別のもので、アプリの速度を遅くしません。自分のラックミドルウェアを記述した場合は、各インスタンスが複数のリクエストに接触するため、スレッディングバグが容易に発生しやすくなります。たとえば、このミドルウェアはスレッドセーフではありません。
# Your Custom middleware that is NOT THREADSAFE
class StatusMessage
  def initialize(app)
    @app = app
  end

  def call(env)
    status, headers, response = @app.call(env)

    if status == 200
      @message = response
    else
      @message = "Bad response"
    end

    # Value of @message could change here,
    # because ivars in middleware are effectively global.
    #
    # If this thread pauses execution here and another thread executes
    # it creates a "race condition".

    [status, headers, @message]
  end
end

# in config/application.rb
config.middleware.use StatusMessage
この場合、@message がグローバルな理由は同じオブジェクトがすべての応答で使用されるからです。ローカル変数 message を使用することで修正できます。インスタンス変数 @message を使う必要はありません。ラックフリーズを使用している場合、gem は freeze メソッドをミドルウェアで呼び出すので、内部状態が変わった場合は例外が変更されます。この gem により、本番環境にデプロイする前に、開発環境であらゆるスレッドセーフティ関連の問題を見つけ出せるようになります。
ステージングしてデプロイする。先に進める準備ができたら、プロジェクトから Rack::Lock を削除します。次のコマンドを実行して、削除されたことを確認できます。
$ RAILS_ENV=production rake middleware
最初に、ステージングアプリまたは Review Apps にデプロイします。スレッド数を 1 より上に増やします。デフォルトのスレッド数を Worker ごとに 5 にすることをお勧めします。ただし、最初はそれより少ない数にして、徐々に増やすこともできます。
$ Heroku config:set MIN_THREADS=2 RAILS_MAX_THREADS=2
アプリケーションがステージング環境で実行されるようになったら、複数の同僚にサイトへ同時にアクセスしてもらいます。
例外をモニタリングして、deadlock detected (fatal) (デッドロックが検出されました(致命的)) などのエラーがないか調べる必要があります。同時性バグを見つけ出して修正するのは難しい可能性があるため、アプリケーションを徹底的にテストした後、本番環境にデプロイします。アプリケーションをスレッドセーフにできると、Puma スレッドとワーカーを使用したスケールアウトは、ワーカーのみを使用した場合よりスループットが増大するため、そのメリットは相当なものです。
アプリケーションが予想通りに動作すると確信できたら、本番環境にデプロイしてスレッド数を増やすことができます。
Puma のプロセスとスレッドの推奨されるデフォルト設定
ここでの推奨値に関係なく、アプリケーションに合わせて値を調整する必要があります。アプリケーションで R14 - Memory Quota Exceeded (メモリ割り当てを超過しました) エラーが発生した場合、プロセスカウントを削減することを検討してください。
Cedar 世代のアプリ
Puma のプロセスとスレッドの推奨されるデフォルト値を以下に示します。
| dyno タイプ | 推奨される Web プロセスカウント (WEB_CONCURRENCY) | 推奨される Web スレッドカウント (RAILS_MAX_THREADS) |
|---|---|---|
| eco | 1 (メモリが十分な場合は 2) | 5 |
| basic | 1 (メモリが十分な場合は 2) | 5 |
| Standard-1x | 1 (メモリが十分な場合は 2) | 5 |
| Standard-2x | 2 | 5 |
| Performance-m | 2 | 5 |
| Performance-l | 8 | 5 |
| performance-l-ram | 4 | 5 |
| performance-xl | 8 | 5 |
| performance-2xl | 16 | 5 |
Fir 世代のアプリ
Fir dyno の並行処理数は、その vCPU 数と同じものを設定することをお勧めします。
以下の資料は包括的なものではなく、変更される可能性があります。アプリケーションのパフォーマンスの調整について完全に理解するには、『The Complete Guide to Rails Performance』(Rails パフォーマンスの完全ガイド) をお勧めします。
プロセスカウント値
プロセスカウントを増やすと RAM の使用率が増加し、制限要因になることがあります。この値を設定するための別の要因は、システムの物理コア数です。GVL のために、Ruby インタープリタ (MRI) は Ruby コードを実行する 1 つのスレッドのみ一度に実行できます。この制限のため、複数のコアを完全に活用するには、システム上の物理コア数に一致するプロセスカウントをアプリケーションで持つようにします。
物理コア数を超えると、プロセスでは限られたリソースを求めて競合が発生します。この競合により、コードの実行に使用できたはずの余計な時間を、コンテキストの切り替えに消費することになります。
dyno 上の vCPU の数は、システムで heroku run bash を使用して nproc を実行して見つけることができます。次に例を示します。
$ heroku run bash --size=performance-l
$ nproc
8
nproc によって返される値には、物理コアに加えて「ハイパースレッド」が含まれており、これらの 2 つを組み合わせたものが vCPU カウントと呼ばれています。Heroku で使用されるすべての物理コアにはハイパースレッドがあるため、「本当の」物理コア数を求めるには、2 で割ってください。たとえば、Performance-l の dyno の場合、4 つの物理コアと 4 つのハイパースレッドがあります。この dyno は一度に 4 つのプロセッサーのみから物理的に命令を実行できます。
eco、basic、standard-1x、および standard-2x の dyno についての nproc の値は正しいですが、これらのコアはコンテナ内で実行中の複数のアプリケーションで共有されています。これらの dyno について nproc ではすべて 8 が返されますが、一度に 1 つのプロセスしか実行できないと推定するのが最適です。
特定の時間に実行できる最大のプロセス数は、物理コア数によって決まりますが、物理コア数を超えるようにプロセスカウントを調整する場合もあります。複数のプロセスがあると、1 つのプロセスがクラッシュした場合の冗長性を提供することができます。Puma Worker プロセスがクラッシュすると、再起動しますが、このプロセスは瞬時には動作しません。マスタープロセスが Worker プロセスを置換するとき、冗長性があれば、2 番目のプロセスによって要求を処理できます。このため、可能な場合は最低 2 つのプロセスを持つことを通常はお勧めしています。
物理コア数を超える複数のプロセスを持つことのもう 1 つの理由として、アプリケーションがスレッドセーフではなく、複数のスレッドを実行できない状況があります。このシナリオで 1 つのプロセスのみを実行している場合、アプリケーションで IO 呼び出し (ネットワークリクエストやデータベースクエリなど) を行っている間は、コアがアイドル状態となります。このシナリオで、余分のプロセスがあれば、IO を待機している間に別のリクエストを処理することができます。
プロセスタイプを設定するときの最後の検討事項はメモリの使用です。プロセスによるスケールアウトでは、通常の場合、スレッドよりもメモリを多く使用します。このことについての詳細は、「what is a thread」(スレッドとは) を参照してください。アプリケーションで使用するメモリが多すぎてディスクへのスワップが開始された場合、アプリケーションのパフォーマンスが劇的に低下します。プロセスカウントを調整して、R14 - Memory Quota Exceeded (メモリ割り当てを超過しました) エラーが発生しないようにすることを強くお勧めします。
スレッドカウント値
プロセスカウントの最適な値が見つかったら、今度はシステムのスレッドカウントを調整することができます。Ruby (MRI) プロセス内の複数のスレッドにより、IO (データベース呼び出しやネットワーク呼び出しなど) が関与するときにアプリが一度に複数のリクエストを処理できるようになります。オペレーティングシステムではスレッド間でコンテキストの切り替えを行う方が「低コスト」であるほか、メモリが共有されるため、一般的にプロセスよりも全体としてメモリの消費量が少なくなります。システムにスレッドを追加すると Ruby アプリのメモリ使用量が経時的に増加しますが、これはたいていの場合スレッド数を調整する際の主な懸念事項ではありません。
各プロセスタイプに対してスレッド数を同じにすることをお勧めします。5 を採用した理由の 1 つは、これが Active Record 接続プールのデフォルト値であることですが、この値で「十分である」ことが研究によって示されているためでもあります。その後の Rails では、デフォルトが 3 に変更されています。
スレッドカウントを調整するための dyno の負荷 (Performance dyno に関する) - Heroku では、CPU の使用率を理解するために Dyno Load メトリクス が提供されています。理想的には、スレッドカウント全体 (プロセス数×スレッド数) を調整するとき、アプリケーションで利用可能なすべての CPU 時間を使用する必要があります。このメトリクスの負荷の値は、ある特定の時点で待機または実行中のタスクまたはスレッドの数を表しています。この数が多い場合、スレッドの発生が多すぎて、アプリケーションに競合が発生していることを示しています。この数が物理コア数を上回ることがほとんどない場合、アプリケーションはスレッドの追加によるメリットを受ける可能性があります。
詳細は、「What is an acceptable amount of Dyno load?」(許容可能な Dyno の負荷の量) を参照してください。
サンプルコード
オープンソースの CodeTriage プロジェクトは Puma を使用するため、Puma 設定ファイルを repo で見ることができます。